Setting up Feedburner RSS and Email Subscription For Your Blog
Lots of people have been asking me about RSS feeds and Feedburner over the past few weeks.
So I’ve decided it’s time to update my ‘how to’ Feedburner info so that:
- All the required instructions are in one post
- It is current for the latest version of Edublogs and Feedburner
What is RSS?
RSS (means Really Simple Syndication) retrieves the latest content from the sites you are interested and pulls them into your feed reader where you can read them all in one location rather than visiting each site separately.
Watch RSS in Plain English to learn more!
The presence of the orange RSS icon indicates a site has an RSS feed and means you can subscribe to it using a feed reader.
What is FeedBurner?
Most blogs have RSS feed which is detected automatically by commonly used feed readers when the blog URL is added to the reader.
However, if you want to make it more obvious and easier for readers to subscribe using RSS, or want to know exactly how many people subscribe to your blog then the best option is to add a Feedburner RSS feed and email subscription to your blog.
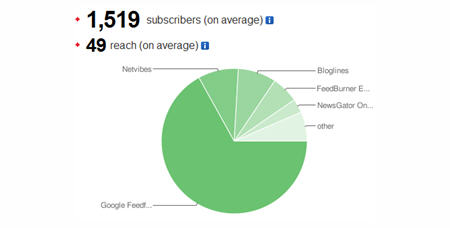
Feedburner is a free web service which enhances bloggers and podcasters ability to manage their RSS feeds and track usage of their subscribers.
Setting Up Your Feedburner Feed
1. Go to Feedburner and sign in to Feedburner with your Google Account (create a Google Account first if you don’t have one!).
2. Add your Blog URL to the Burn a Feed Right This Instant and click Next.
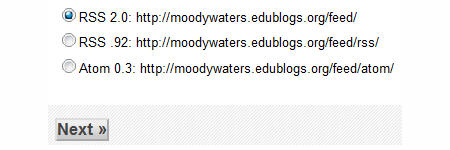
3. Leave RSS 2.0 source selected and click Next.
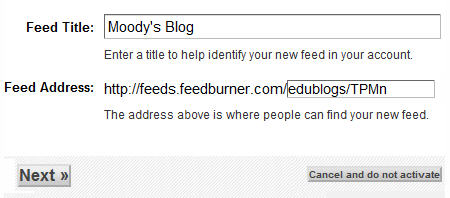
4. On “Welcome” page, make sure you are happy with the title and FeedBurner address (URI) of your new feed and then click Next.
5. On the Congrats! page click Next
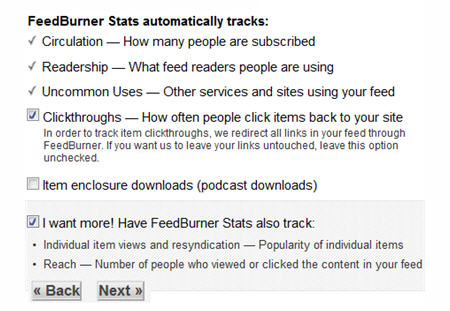
6. On the stats configuration page select Clickthroughs and I want more! and then click Next.
Adding Your Feedburner Feed To Your Blog
This is used to add the RSS icon and easy subscribe options to your blog side bar using a text widget as explained below:
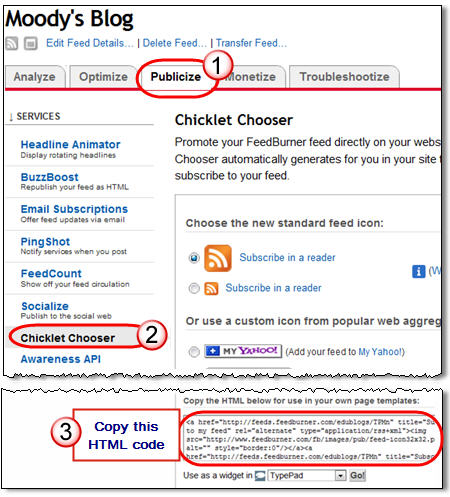
1. Click on the Publicize Tab > Chicklet Chooser in your Feedburner account and copy the HTML code.
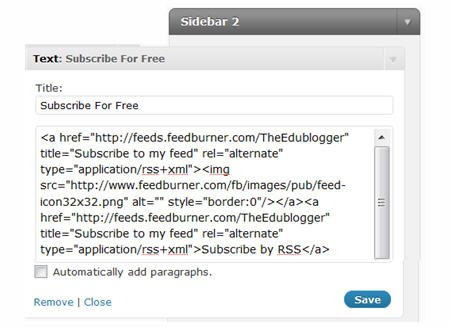
2. Go to Appearance > Widgets in your blog dashboard
3. Click on the desired Sidebar to expand (so you can add the widgets) Please note: In new blogs sidebars in your dashboard are empty and adding widgets automatically removes the default Edublogs widgets
4. Add a text widget to the desired sidebar by dragging it from the Available Widgets into the Sidebar area on the right.
5. The widget will automatically open — just add the HTML code from FeedBurner, click Save and then Close.
Adding a FeedBurner Email Subscription
It’s important to add an email subscription option to your blog sidebar as some readers prefer to receive latest posts from blogs using email subscription.
1. Click on the Publicize Tab > Email Subscription in your Feedburner account and click on Activate.
2. Copy the HTML code.
3. Go to Appearance > Widgets in your blog dashboard
4. Click on the desired Sidebar to expand (so you can add the widgets)
5. Add a text widget to the desired sidebar by dragging it from the Available Widgets into the Sidebar area on the right.
6. The widget will automatically open — just add the HTML code for Feedburner email subscription, click Save and then Close.
7. Now readers simply enter their email address and then click on “Subscribe” and Feedburner emails your entire post to them on the day after it has been published on your blog.
Redirecting All Your Blog Feed To Feedburner
Unless you redirect all your blog feed to Feedburner you won’t get accurate subscriber numbers because some of your readers subscribe using your original blog feed.
If you’re an Edublogs supporter you can redirect your blog feed as follows:
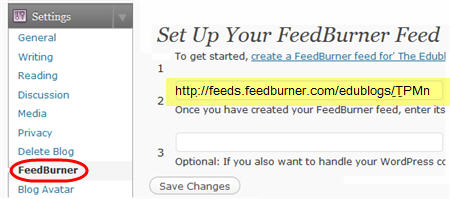
1. Go to Settings > Feedburner in your blog dashboard
2. Add your Feedburner address and click Save Changes.
3. Now all your feeds is automatically redirected through FeedBurner and you’ll be able to track subscriber numbers accurately.
Setting up Feedburner RSS and Email Subscription For Your Blog
![Setting up Feedburner RSS and Email Subscription For Your Blog]() Reviewed by Ankit Sharma
on
03:20
Rating:
Reviewed by Ankit Sharma
on
03:20
Rating:




No comments: